Monday, September 3, 2012

Wedding Hats! (From Scratch)

As you well know, I've been spinning and dyeing yarn lately like a madwoman. You may have wondered: yes, but what are you going to make with it?? Well, my experiments have finally proven useful. As a wedding present to my lovely aunt Louisa and her new husband George, I made some matching wool hats with my handspun/dyed yarn collection. They turned out awesome, I was really happy with them. And don't worry, they aren't itchy, they are lined with thin fleece. :)
The stash
Congrats to the newlyweds! <3

Friday, August 17, 2012

Natural Dyeing: Blackberry

Turns out blackberries can do other things besides make delicious treats and be a pain in the garden. I love the nice purple and green that I got with berries and leaves/stems. I used an alum mordant on the yarn before dyeing. 

What I'm learning to love about natural dyeing is that each batch is unique! You never really know what you are going to get even if you try and repeat exactly what you did before. It's a wonderful surprise every time! 


dyestuff. 


Wednesday, August 1, 2012

Processing Raw Fleece

Apart from actually shearing a sheep or wooly animal (hopefully I will get to do this someday), I have officially worked through the entire fleece to yarn process!


Recently I was given a bag of raw, stinky, dirty, greasy, lovely local sheep's fleece. Finally I began the project of processing it. Washing fleece is easy! I was afraid at first because of the dangers of felting, but I had no problems. I wasn't even that careful.

How To Wash Raw Fleece:
I washed my fleece in 4 steps. It took about 40 minutes.
1) hot water bath, 2) hot soapy water bath, 3) hot rinse bath, 4) another hot rinse bath.
They say that temperature shock can cause the fleece to felt, but those people are too paranoid I think. Start by submerging a big pile of dirty fleece into a big bowl of hot water - as hot as you can still put your hands in. The hot water will help to remove some of the grease from the wool. Do not agitate. This really will cause felting. I just gently pressed it and spun it around occasionally with my hands. After letting it sit in the hot water bath for about 10 minutes, drain the yucky water slowly into the sink while holding onto the wool in the bowl. Remove the wool from the bowl and fill it up again, this time with hot water and some soap. The amount of soap isn't particularly important, probably similar to washing dishes. Wait another 10 minutes. Continue in this fashion, giving it however many hot water rinse baths to get the soap out. Do not try and rinse the wool under a faucet. It will get rinsed just fine by soaking in a couple of hot water baths. Squeeze out the water, and lay out to air dry. It should come out looking like step 2 in my picture above.

Carding wool is important for getting the fibers aligned and ready to spin. I figured it out using this youtube video. I use wire dog brushes instead of carders, because they work great and are cheap.


I'm getting faster and better at spinning too! That skein in the picture only took me the better part of an evening! I'm excited to do some more dyeing experiments on it. :)

Natural Dyeing: Queen Anne's Lace (Wild Carrot)


I got a nice pale yellow on my homespun wool with Queen Anne's Lace. Also known as wild carrot, this grows wild all over the northwest. Credit goes to Jenny Dean and her book Wild Color.

Have I mentioned yet how AMAZING this book is? My mom got it for me for my birthday and I've just been devouring it. It provides clear and lovely instructions for dyeing with all kinds of flowers and trees and weeds and such, most of which are easily harvestable from the wild around here.

One thing that happens in the summer is that my free bus pass goes away since I am no longer a student. Another thing that happens is that I walk everywhere because I don't want to spend a dollar on the bus. Lately, I've been doing the lovely hour long walk downtown almost daily, and it's been nice to get a little more physical activity into my routine. Frequent nature walks, combined with knowledge from Wild Color has helped me begin to spot dye stuff everywhere I go!

This is where I first noticed the abundance of Queen Anne's Lace. It's everywhere under the 5th avenue bridge and all the way along the railroad track and beach trail that goes to the west side. One day on my walk, I brought along scissors and a bag and went crazy.


Following the recommendations in Wild Color, I used alum mordant and a hot dyeing method, boiling the plant matter for at least half an hour, and simmering the yarn with it for another 45 minutes. I would recommend putting the dyestuff or yarn in some kind of mesh bag or cheesecloth or something, because plant chunks got all up in my yarn.


Monday, July 23, 2012

Fiber Heaven


For my birthday, my mom gave me the best present in the world: a shopping spree at The Artful Ewe, a wonderful yarn and fiber shop in Port Gamble! I went crazy.


So, since a lot of the fiber was raw and un-carded, I've been learning how to card wool. I've been doing it as I spin, picking out a small piece of a color I like, carding it, and then spinning it, one at a time. I've also been using wire dog brushes instead of carders. They are much cheaper and work perfectly for my purposes.

So needless to say I've been having a blast playing with all this new and colorful fiber. This is my latest creation. (Also see the picture above)

Wednesday, July 18, 2012

Black Bean and Onion Socks

These are my wooly, slightly felted, super warm, comfy socks that I made with my black bean and onion dyed handspun yarn! I've only made one so far because I need to make some more of the white yarn. Seriously, so comfy. Come winter time, I will wear them constantly. 
The colors changed a little after being felted because not all the dye had come out in the rinse, but I liked the colors better afterwards anyway.


Saturday, July 14, 2012

Natural Dyes: Black Beans

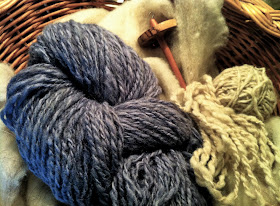
Who would have thought that black bean juice would dye yarn a beautiful shade of blue-grey? I had a really hard time capturing the color of this yarn in a photograph. It's a little bluer than the photo shows.

I wanted to have a little variation in this yarn, so I tried to make one lighter skein and one darker skein for plying together. This is how I go about winding and preparing the yarn for dyeing. I also used an alum mordant on the wool before dyeing. 
Method:

Black bean dye is a cold dye, meaning that you let the yarn soak in cold for a long period of time instead of simmering it on the stove. The yarn must also be mordanted to actually absorb and keep the dye, unlike the onion skin dye.

I soaked a bag full of black beans (maybe 3 cups?) in water for 24 hours until the juice was nice and blue. I then prepared two containers of dye, one with just bean juice, and the other with all the beans left at the bottom. I thought that the container with the beans in it would come out a little darker. I then added one skein to each container. 
I let the no-beans skein soak for about 12-14 hours, and I let the  beans skein soak for 36 hours. The one I let soak a little longer with the beans turned out a tiny bit darker and grayer, but I was surprised that the difference was so subtle. The closer skein is the shorter soak in the bean juice, and the farther away skein is the longer soak in bean juice with beans still in the container. Although there wasn't a whole lot of contrast, I think the subtle difference gave the final yarn some nice character.
I can't stop spinning!! It's my new addiction! 

Friday, July 13, 2012

Plying Yarn: Color Experiments!

After getting inspired by a book I came across on spinning variegated sock yarn, I just HAD to try it! The next step will be to learn to dye my own fiber, but I wanted to experiment and didn't want to deal with that step right now so I went to the yarn store and bought a few ounces of dyed fiber. This is what came out of it!! It was SO fun to make!!


The way you make yarn like this is to randomly spin multiple colors of fiber, switching colors every couple of feet. It sounds tedious, but you get the hang of it and it goes just as fast as normal spinning if you've got a system down. I kept the different colors on my lap and just switched out whenever I felt like it. 

I made two bobbins full:


Then, once I had the two balls of randomly colored yarn, I plied (plyed?) them together. This was the best part, as you get to watch the yarn come together in all sorts of fun color combinations!! Plying means spinning the two strands together in the opposite direction that you spun the yarn in. This makes the strands, which have a lot of excess spin in them, relax and stabilize.


Here is my beautiful new creation next to the onion skin dyed yarn I made yesterday.


 I can't stop making yarn!! I've got two more skeins soaking in a black bean dye bath right now as I blog! My new morning routine has consisted of waking up early, listening to the radio, and spinning, before the house wakes up. It's a great way to start the day! 

:)

Wednesday, July 11, 2012

Natural Dyes: Onion Skins

Now that I've gotten the hang of spinning yarn, I've moved onto the next project: dyeing yarn! I was going to begin my experiments with synthetic dyes, but then I learned about natural dyes and got excited about that instead. This blog provided some great ideas and tutorials. 

Here's the final product! The colors are more beautiful and rich in real life. I'm so pleased with how it turned out!


At first, I thought about starting to collect onion skins in the kitchen and just dyeing my yarn when I got enough. But then I remembered that I'm an impatient person. Instead, I went to Safeway and gathered all the loose onion skins from the onions in the produce section and tried to pretend I wasn't doing something strange. This surprisingly yielded enough for a batch! Yay for instant gratification!

Something to know about dyeing is that if you want the dye to stay in the fiber permanently you need a mordant. It's easy and cheap to make a basic mordant. These are the instructions I used. All you need are two ingredients: Alum and Cream of Tartar; both of which can be found in the grocery store spice section. This makes an alum mordant


Onion skin dyeing is unusual in that it does not require a mordant. However, mordants can do a lot to change the way the color comes out. To experiment with this, I used alum mordant on my main skein, and then I did a little sample on the side without any mordant. In the top photo, the larger middle skein is with the alum mordant treated yarn, the smaller more brownish yarn on the right is without any mordant. The yarn on the left is the original color of the fiber. 

Here was my yarn dyeing process:

Step 1: Make yarn into a loose skein, and tie yarn in several places to prevent tangling during the dyeing process.

Step 2: Heat up the fiber. Fill pot with water, place fiber in the water, and slowly heat it to a light simmer. (I used a thermometer the first time just to get an intuition about it. I heated it to around 80-90 degrees. 

Step 3: Carefully remove fiber. Mix 1/2 tsp alum and 1/4 tsp cream of tartar into water. Return fiber to mordant bath and simmer for an hour.


Step 4: While yarn is in the mordant bath, prepare the dye. Throw all the onion skins into a pot, add some water, and boil the onion skins for around half an hour or until the water seems saturated with color. 


Step 5: Drain mordant bath, and gently move the yarn from the mordant bath into the dye bath. I left the onion skins in, and I think that this gave the color a little bit of variegation and character. 

Step 6: Simmer yarn in dye bath for around half an hour. Perhaps if left in the bath overnight to cool or simmered for longer the color would have come out darker. I don't know, I'm still an amateur.  


Step 7: Pour pot of yarn and dye into a clean sink. Gently rinse the yarn in hot water. (Temperature shock can cause the yarn to felt. This is bad!) 

Step 8: I used a salad spinner to get the yarn semi-dry. Then I hung it up over the sink to dry overnight.

Step 9: Show everyone, admire the colors, photograph, and start a project!

Stay tuned for black bean dye next! :)

Tuesday, July 3, 2012

Hatstravaganza

I've been enjoying experimenting with fair-isle knitting. I spent a lot of our recent vacation to the midwest in front of air conditioning or on the Mississippi river knitting hats. Here are the fruits of my labor:


Wednesday, May 23, 2012

Evergreen Craft Fair


Sometimes I need reminders that making and selling knitted items is not a very profitable business venture. Still, it was fun, and I scored some great trades with the other vendors!
:)

my booth!

Wednesday, February 22, 2012

Katie Learns to Spin

When Ari and I took a road trip last summer, we acquired a spinning wheel along the way, which Ari's stepmom generously gave to me when I told her that I've always wanted to get into spinning. It's hard to be a knitter/fiber artist without wanting to get into it. 
Isn't she beautiful?? Since we dragged her across the country however, her main function has been to sit in the corner of the living room looking handsome and gathering dust, since I have been unable to find the time to devote to it in the craziness that is full time school. Finally, this weekend I had my first informal spinning lesson, and took off from there in an excited frenzy. I'm not a master yet, but I'm getting the hang of it! My yarn is still pretty lumpy and inconsistent, but I'm still learning. 
 
Not long after I had produced a few small balls of yarn did I proceed to figure out how to dye them. The internet told me that a fun way to dye wool is with Kool-Aid. So that's what I did! I followed this tutorial.
Essentially, you just put the Kool-Aid in a pot of water (I learned that the water to dye ratio isn't what's important, it's the dye to yarn ratio. The yarn will soak up the same amount of dye no matter the amount of water) and heat it until it almost boils, and then turn it off and let it sit covered in the hot water for at least half an hour. Then you rinse it (in hot water gently so as not to felt it) and squeeze it out and hang it to dry. Easy!
Presto! Permanently colorful, fruit-smelling, uneven, homespun yarn! I'm sure I'll think of something to make with it. Stay tuned for further spinning experiments, and more details about the spinning process. Also, did I mention that I'm having SO much fun with this???

Tuesday, February 21, 2012

Wacky Felted Basket

If you don't know my housemate Genevieve, she is a wonderful, wild, and wacky lady. For her birthday, I made her this felted basket to match. I crocheted it with scraps of wool leftover from years of slipper making, and then needle felted the embellishments and sewed on the beads. I had so much fun making it!


Friday, January 6, 2012

Fibonacci Scarf and Prime Factorization Hat

What do you knit for a mathematician that is aesthetically pleasing and also intellectually interesting? Voila! For Ari's birthday I made him a Fibonacci Scarf and a Prime Factorization Hat. I gave it to him and told him that he had to find the math in each gift, and he was so excited and impressed when he figured it out!

The idea of the Fibbonaci scarf is simple: stripes according the the Fibbonaci sequence, which is a famous mathematical sequence found by adding the two previous terms to get the next term. 
ie. 1, 1, 2, 3, 5, 8, 13, 21, 34, 55, etc. This scarf is really four short sequences, each half contains an increasing and a decreasing sequence overlapped with each other. 


The only math-y part of the prime factorization hat is the band around the bottom. I got the idea from this amazing prime factorization sweater pattern. The prime factorization of a number is simply any number broken down into it's prime factors. For example: the prime factorization of 16 is 2x2x2x2, and the prime factorization of 15 is 3x5. The band starts at one (the grey square, since one is special and isn't really prime) and goes around. Each new prime gets it's own color, and each composite (not prime) number is represented by it's prime factors. So clever. It only took him a few minutes to figure it out though.